
[GBA] RetroSix CleanJuice (LiPo)
Installation
Section titled “Installation”Installing your RetroSix CleanJuice GBA is as easy as can be. Here it is step by step:
- Connect the battery to the CleanJuice GBA board (it only fits one way, so don’t worry).
- Shell trimming
- RetroSix shells: no action needed, continue with the next step (see also RetroSix shell trimming).
- Original (OEM) or other aftermarket shells:
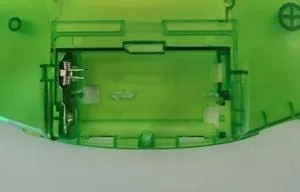
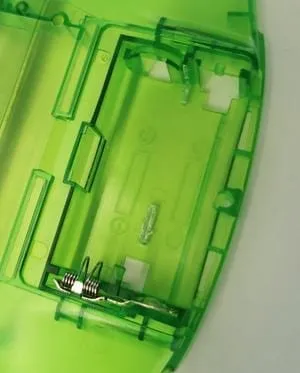
- Trim the little stump at the bottom of the battery compartment flat.
- On the right side of the battery compartment there is a plastic divider that holds each AA battery between the console’s terminals. Trim it so that it forms a flat wall, and along the bottom so the divider is completely removed. See the images below.
- Do not trim the plastic divider on the left side of the battery compartment.
- Optional: Peel off the double-sided tape to keep the battery firmly in place. In most cases it isn’t needed, but it’s there if you want it.
- Note: Using the double-sided tape makes it much harder to remove the battery later.
- Place the battery into the shell with the wire coming out at the top left corner.
- Insert the CleanJuice GBA board left side first, then push down the right side so that the springs of the CleanJuice GBA touch the GBA battery terminals.
- Note: You may need to carefully flex the board slightly for it to fit snugly.
- Use a RetroSix USB-C battery cover (sold separately, in various colors), or cut a hole for the USB-C port (3D printer .stl file) by drilling 3 holes in the center of the battery cover with a 4 mm drill bit.
- Double-check that the battery sits flat in the battery compartment and that the CleanJuice GBA board sits flat on top of the battery. Finally, check that the springs on the right press against the GBA’s battery terminals with a bit of pressure.
- Put the battery cover on, lining up the USB-C port of the CleanJuice GBA with the opening in the cover.
- Give the CleanJuice GBA a full charge and get ready for some gaming!
Fixing battery drain
Section titled “Fixing battery drain”V1.1 and V1.2: Drains while not in use / won’t hold a charge
Section titled “V1.1 and V1.2: Drains while not in use / won’t hold a charge”If you have this issue, there is a fix that may help. Please note that it is not guaranteed to work. If it doesn’t, the module may get very hot to the touch. Do not keep using the module in that case. Before doing the fix, inspect your battery for bloating, leaking, puncture marks etc. If the battery looks damaged in any way, do not keep using the module.
The culprit is double battery protection:
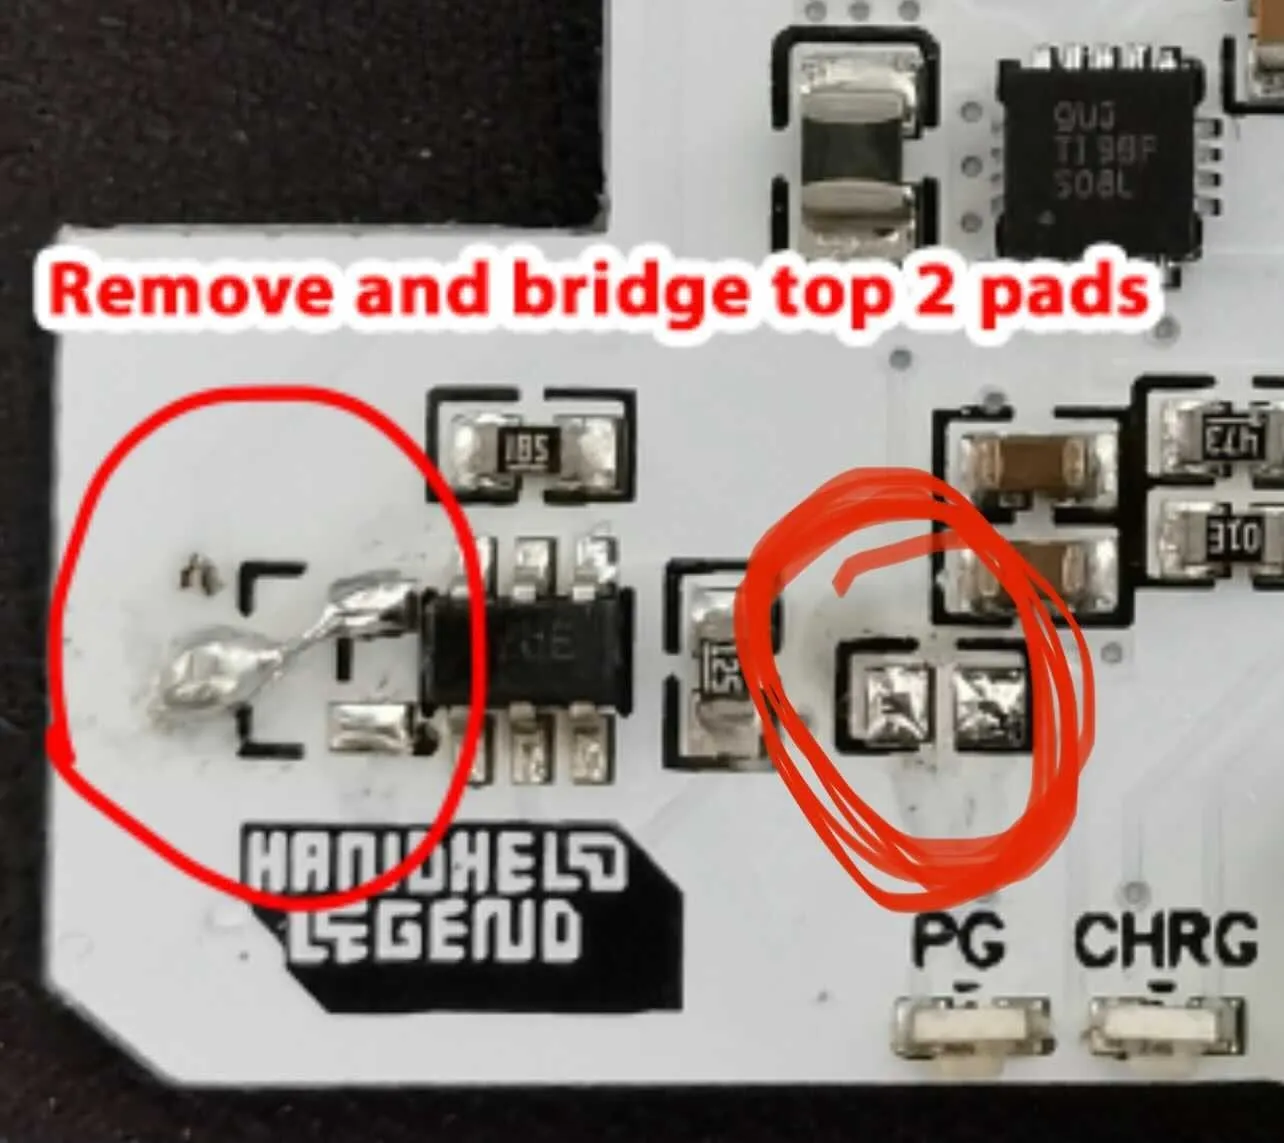
If this does not solve the issue or your battery is damaged, contact support@handheldlegend.com.
V1.2 and V1.3: Fully charged but shows as drained / module gets too warm
Section titled “V1.2 and V1.3: Fully charged but shows as drained / module gets too warm”Here the problem is an extra resistor the manufacturer fitted by mistake:
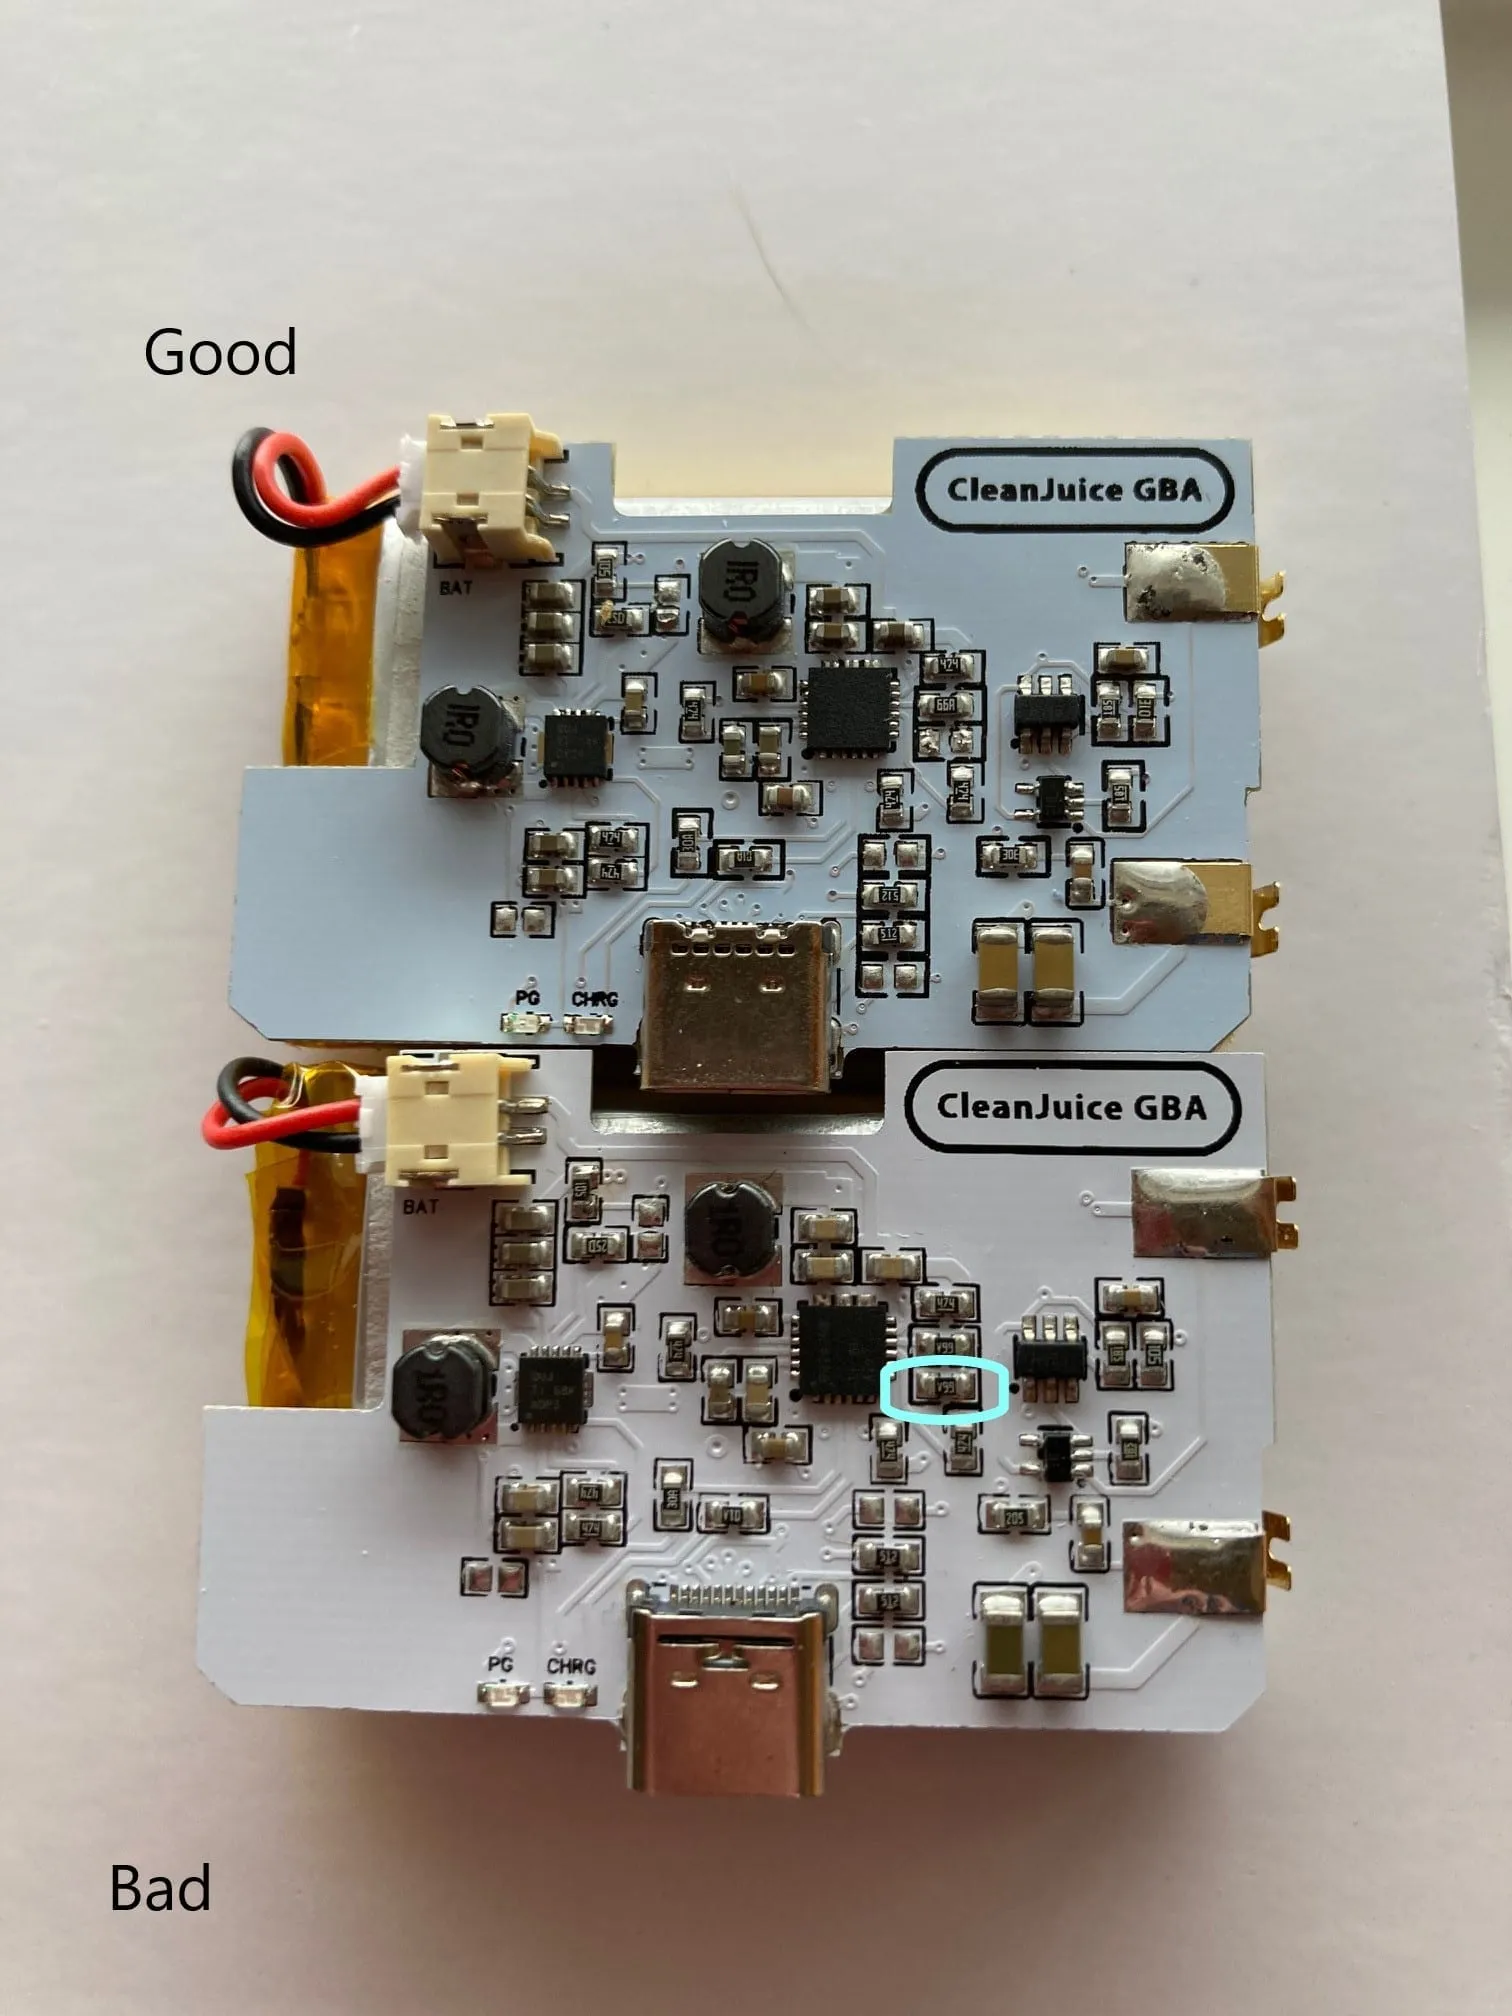
Remove the extra resistor circled on the bottom PCB in the photo above. Before doing the fix, inspect your battery for bloating, leaking, puncture marks etc. If the battery looks damaged in any way, do not keep using the module.
If this does not solve the issue or your battery is damaged, contact support@handheldlegend.com.
Troubleshooting
Section titled “Troubleshooting”Is your Game Boy Advance CleanJuice battery mod hissing or getting hot? Is the board draining the battery when you’re not playing?
Hissing is normal while the capacitors charge on first installation. Your battery and PCB should not get hot, though. If you hear a sound coming from the battery, it is most likely faulty and should be replaced.
Video guide
Section titled “Video guide”This video gives you a more detailed look at the module and how to troubleshoot it:
More troubleshooting
Section titled “More troubleshooting”- Q: The CleanJuice GBA board keeps popping up on the right side (and doesn’t touch the console’s battery terminals).
- A: There are two possible causes: the terminals are pressed in a bit, and/or the shell’s manufacturing tolerances make the battery compartment slightly too wide or too narrow.
- Terminals: Gently and slowly bend the springs of the CleanJuice GBA board outward (to the right) so they make better contact when the board is in place.
- Compartment size: Some shells need a different approach: leave the battery connected and in the compartment, set the board in on the right first so the contacts touch, then lay the left side flat. You may need to gently flex the board so pressure holds it in place.
- A: There are two possible causes: the terminals are pressed in a bit, and/or the shell’s manufacturing tolerances make the battery compartment slightly too wide or too narrow.
Module information
Section titled “Module information”The chart below gives you estimates for common power sources and how long you can expect your console to run. How long your CleanJuice lasts depends on the console you use and the upgrades you have. It’s all about the watts. Using the GBA as an example: standard 2x AA batteries with 1200 mAh have 2.88 watts of power. The best AAs on the market, 2x Eneloop Pro, have 6 watts. The CleanJuice has 6.29 watts. More power = longer life.
A stock GBA uses 0.28 watts. With AA batteries that is 2.88 / 0.28 = 12 hours. Batteries aren’t perfect, so you normally take off 15%: 12 × 0.85 gives about 10.2 hours of gameplay. That’s the basic math. Whether or not it’s exact in every case, the comparison between power sources is accurate because it is based on actual wattage.
| Device | AAs | Eneloop Pro | CleanJuice |
|---|---|---|---|
| Stock GBA (0.28 W) | 10.2 hours | 18.2 hours | 19.1 hours |
| IPS GBA + CleanAmp (0.495 W) | 4.9 hours | 10.3 hours | 10.8 hours |
| IPS GBA + CleanAmp + EZFlash (0.9 W) | 2.7 hours | 5.6 hours | 5.9 hours |
Note: We do not recommend the EZFlash range of products. Their internals are very low quality and extremely power hungry: on their own they use more power than the entire console plus IPS and CleanAmp at full volume.
Low battery indicator
Section titled “Low battery indicator”The Game Boy Advance CleanJuice turns the built-in low power LED red when the battery is low, leaving about 15 to 20 minutes of play time.
Note: versions sold before August 2020 need the Low Voltage add-on board for this.
Charging
Section titled “Charging”The CleanJuice takes about 1 to 2 hours to charge from completely empty. This may vary depending on your charging cable.
Indicator lights
Section titled “Indicator lights”There are 2 LEDs on the CleanJuice PCB itself; colors may vary.
If the light labeled PG is on, the USB cable is powering the system. This also means you can run your console from USB without draining the battery (plug and play).
If the light labeled CHG is on, USB is charging the battery. When it goes off, the battery is fully charged.
Both lights are on while the module is charging. Once it is fully charged, only the PG light stays on.
If you connect a USB cable and the PG light does not turn on, your cable or power supply is faulty.