
[GBA] RS CleanAmp Pro Audio Amplifier
The CleanAmp Pro replaces the original audio board of the Game Boy Advance with a modern and much louder Class-D amplifier. The CleanAmp Pro is equipped with PureSilence, which ensures complete silence when the volume is turned down to 0 - both in the headphones and in the speaker.
Installation
Section titled “Installation”First of all, it’s always best to test whether the sound of your original console works in general.
Open the Game Boy Advance with a Tri-Wing screwdriver by removing the six screws on the back and one more Phillips screw in the battery compartment.
Once you have opened the unit, it’s easy to remove the mainboard from the shell as well. To do this, undo the three screws on the mainboard. Before you lift out the board, push the tabs on both sides of the ribbon cable connector upwards towards the shell. This releases the pressure on the ribbon cable so you can pull the cable out. The display stays in the front half of the shell. Now you can remove the mainboard from the shell.
Remove the old speaker from the front board by either cutting or desoldering the speaker wires.
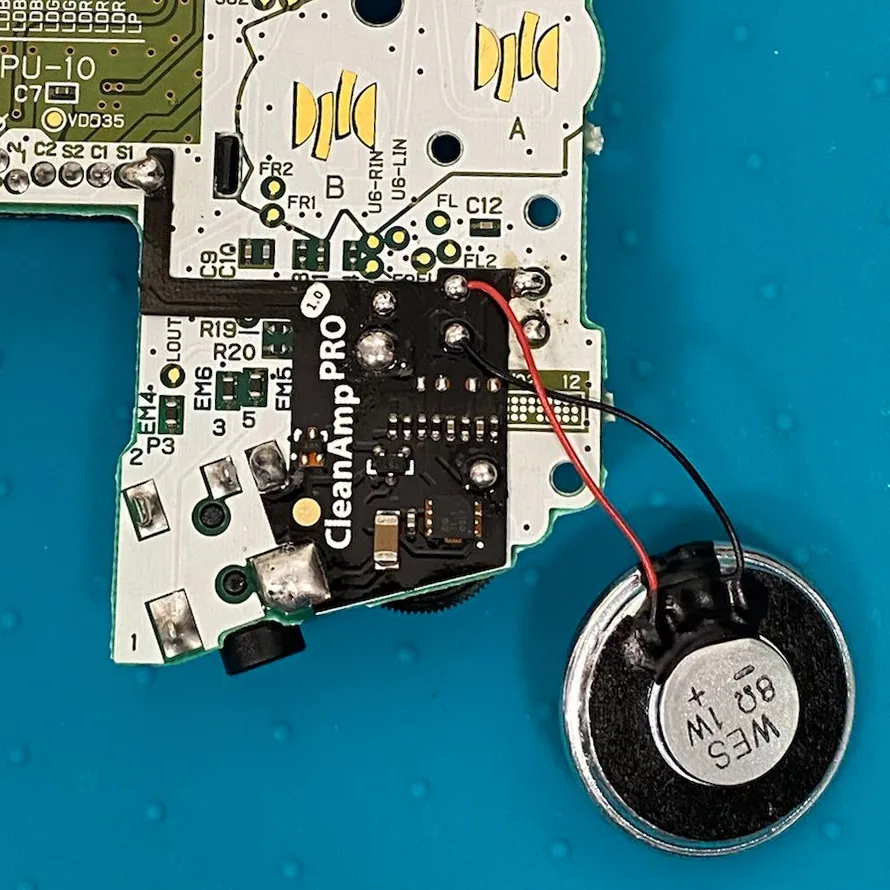
Solder the pads on the Game Boy Advance to the pads of the CleanAmp module as shown in the picture.
Be careful when soldering the CleanAmp pads so that you don’t cause any short circuits or knock off nearby resistors or capacitors.
Solder the two wires at the top right corner of the CleanAmp to the speaker wires. Polarity doesn’t matter – you can solder the wires to either side.
Troubleshooting
Section titled “Troubleshooting”The bottom left pad is ground and is connected to pin 4 of the headphone jack.
The top right pad is the audio input. This is the console’s unamplified, volume-controlled audio signal. It is connected to the upper original speaker wire pad.
The top left pad is the power supply from the Game Boy Advance. Connect it to S1 of the module pins at the top left. The voltage should be around 3 volts.
The middle left pad is the headphone pin, which is pulled to ground when no headphones are connected and “floats” (has no connection) when headphones are plugged in. It is connected to pin 5 of the headphone jack. If there is no sound output, you should first check whether the problem can be fixed by soldering a wire from this pad to the ground pad (pin 4 of the headphone jack). If audio then works, but no longer works when connected to the correct point, the headphone jack is damaged. In this case you can permanently solder the wire to the ground pad (pin 4), but the speaker will then no longer be switched off when headphones are plugged in.
The middle round pad is the PureSilence pad, which is connected to the “vol” via. When the volume wheel is turned all the way down, the sound is completely cut for the speaker and the headphones, resulting in absolute silence. If you run into sound problems, this solder pad can be removed to diagnose faults. If it is removed, the PureSilence feature is no longer available.
NOTE: The Dehum Kit is highly recommended to remove audio noise from the board.